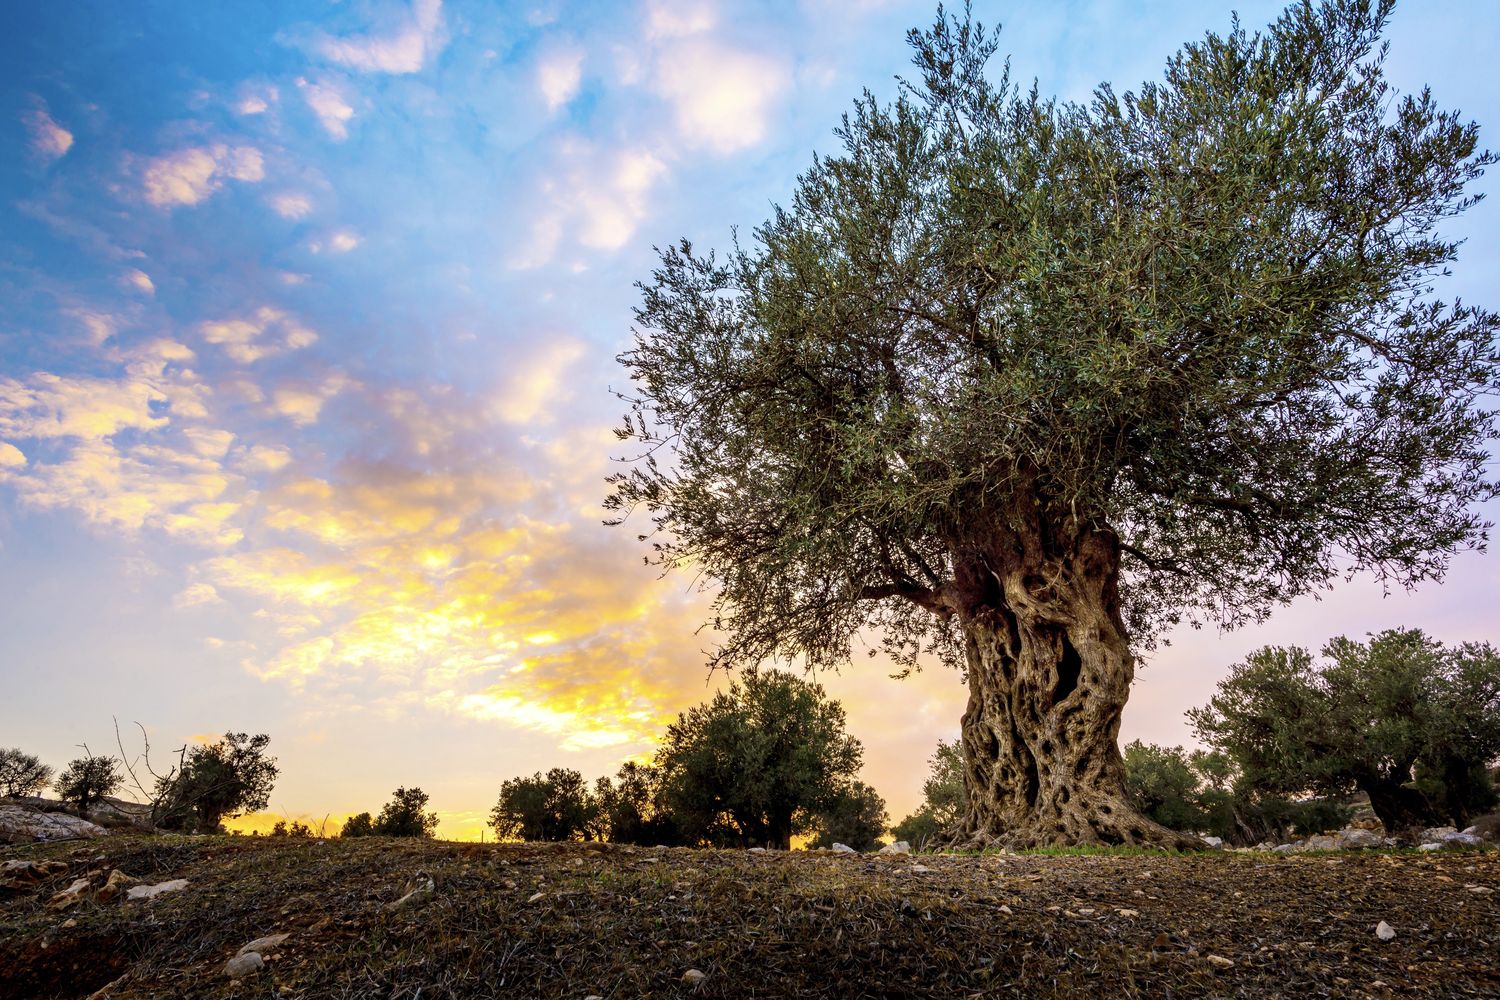
Olive trees hold a special place in many cultures around the world. With their gnarled trunks silvery green leaves and clusters of ripe fruit, they have inspired artists and photographers for centuries. If you want to photograph these majestic trees yourself, there are some tips and techniques to help you capture their graceful forms and textures.
Why Photograph Olive Trees?
There are several reasons why olive trees make excellent photographic subjects
-
They look different from other trees because their branches twist and their leaves are silvery. This makes them visually interesting.
-
Olive trees are symbolic, representing peace, wisdom, abundance, and resilience. Photographing them evokes these deeper meanings.
-
They are found around the world, especially in Mediterranean regions, so you can photograph olive trees whether you live nearby or are traveling.
-
Old groves contain trees that are hundreds of years old. Their mossy, knotted trunks and branches have tons of character.
-
The trees have tiny white flowers in the spring and green and black olives that ripen in the summer and fall, giving the garden a lot of color.
In short, olive trees make it easy to capture stunning and meaningful images.
Tips for Photographing Olive Trees
Here are some tips to help you take eye-catching photos of olive trees:
Focus on Details
Close-ups of the tree’s trunk, branches, leaves, and olives make for interesting patterns and textures. Shoot at the tree from different angles, like straight up or across the branches. Use selective focus to isolate specific elements.
Capture the Whole Tree
Wider shots showcase the olive tree’s full shape and form. Try to include some sky to frame the branches. For tall, mature trees, use a wide angle lens to fit it all in.
Pick the Right Lighting
Early morning or late afternoon sunlight filtering through olive tree branches results in beautiful images. The soft light illuminates the leaves nicely. For moody shots, photograph in the shade or at night using artificial lighting.
Choose a Creative Composition
Lead the eye through your olive tree scene using framing or perspective. Shoot down a row of trees receding into the distance. Silhouette the tree against a sunset sky. Find unique vantage points like up in the branches.
Show the Surroundings
Context can enhance your photos. Include nearby hills, stone walls, buildings, or people for a sense of place. Shoot olive groves, orchards, and farms to convey the tree’s agricultural connections.
Focus on Color and Contrast
Capture the differences between grey-green leaves, brown branches, silvery undersides of leaves, and ripe black olives. Convert to black and white to highlight form and texture. Try different effects like boosting vibrancy.
Play with Motion
Wind rustling the olive branches makes the trees come alive. Use slow shutter speeds to artistically blur movement. Position people or objects like laundry blowing in the breeze.
With some creativity and these tips in mind, you can portray olive trees in exciting new ways through your photography. Scout locations that showcase the trees at their best and take advantage of optimal lighting conditions. Most importantly, look for compelling ways to capture the beauty, elegance, and meaning of the olive tree.
10 Inspiring Olive Tree Photo Ideas
Looking for some fresh ways to photograph olive trees? Here are 10 creative ideas to inspire you:
-
Silhouette an olive tree against a sunrise or sunset sky. The bare branches will stand out dramatically.
-
Focus on weathered bark texture in black and white. Convert your images to really accentuate the patterns.
-
Capture sweeping shots down endless rows of trees in groves and orchards. Use leading lines to draw interest.
-
Photograph close-ups of dewy olives on the branches in the early morning light.
-
Include people interacting with the trees – like farmers harvesting olives by hand.
-
Shoot olive tree still life images with olives, leaves, flowers etc in the frame. Get creative with compositions.
-
Focus on the striking shadows that olive trees cast on the ground or walls.
-
Contrast the olive tree’s silvery green foliage with the warm light of golden hour.
-
Highlight seasonal changes by photographing olive trees in bloom or laden with ripe fruit.
-
Shoot from unexpected angles, like high up in the branches or underneath the canopy.
Finding fresh perspectives like these will help you capture olive trees in new and exciting ways. Don’t be afraid to experiment with lighting, framing, color, and composition. Scout locations at different times of day and year. With practice, you’ll be able to reveal the unique beauty of olive trees through stunning photographs.
Common Questions About Photographing Olive Trees
Here are answers to some frequently asked questions about capturing great olive tree images:
What is the best time of day to photograph olive trees?
The most flattering lighting is often early or late in the day. The low sun beams through the foliage nicely and casts great shadows. Morning and evening golden hours create warm lighting. Avoid midday harsh overhead lighting.
What settings should I use?
Try to shoot in aperture priority mode, with a low f-stop like f/5.6 for soft background blur. Keep your ISO low for minimal graininess – ISO 100 or 200 is ideal. Shutter speed will vary based on light. Tripods help steady long exposures.
How do I properly expose tricky elements?
Watch your histogram. If the dark branches are silhouetting too much, slightly overexpose. If the bright leaves are blown out, underexpose a touch. Exposure compensation lets you adjust on the fly.
Should I do olive tree close ups or wide shots?
Mix it up! Capture close details of fruit, flowers, bark etc as well as wide vistas of full trees. Both macro and wide angle lenses open up options. Wider landscape shots can place trees in context.
Are olive trees only found in the Mediterranean?
While native to Mediterranean regions, olive trees grow successfully in suitable climates worldwide – including California, Australia, South America and South Africa. If you live in these regions, scout local groves. When traveling look for iconic Italian, Greek or Spanish treescapes to photograph.
With the right approach and techniques, anyone can take stunning photos of beautiful olive trees. Understanding optimal timing, settings, composition, and editing will elevate your images. Be patient observing the trees at different times and look for unique perspectives. Olive tree photography is rewarding for photographers of all skill levels.
Common Mistakes to Avoid
It’s easy to make a few rookie mistakes when first photographing olive trees. Here are some common errors to be mindful of:
-
Shooting at midday when the overhead lighting is too harsh. Sidelighting is much more flattering.
-
Getting the exposure wrong so the leaves are too bright or branches too dark. Check your camera’s histogram.
-
Not paying attention to composition and just snapping whatever tree is in front of you. Carefully consider framing and perspective.
-
Only shooting wide angles and missing more intimate close up details. Mix in some macro photography.
-
Forgetting to focus stack when doing ultra close ups of bark and olives. Use focus bracketing to get full sharpness.
-
Cutting off branches awkwardly by not paying attention to the edges of the frame. Give the tree room to breathe.
-
Trying to capture the whole tree from top to bottom in one shot. Shoot portions or perspectives instead or use panoramas.
-
Not waiting for interesting light like golden hour. Early morning and late afternoon are best for flattering illumination.
-
Using overdone post-processing like oversaturated HDR effects. Keep editing subtle to look natural.
Avoiding these mistakes just takes some practice and patience. Examine your work with a critical eye to identify any areas needing improvement. Learning from experience will quickly level up your olive tree photography skills.
Post-Processing Tips for Olive Tree Photos
Once you’ve captured great olive tree images, you can optimize them with some post-processing:
-
Boost contrast slightly to add punch. The gray tree bark and greenish leaves pop more against each other.
-
Adjust white balance if needed to neutralize any color casts from different lighting conditions.
-
Be careful increasing vibrance/saturation – a little goes a long way to avoid overcooked colors.
-
Use local adjustments to selectively brighten or darken certain parts of the image. Lift shadows on shaded bark for example.
-
Dust spots are common on old olive wood. Use the healing brush to cleanly remove any flaws or blemishes.
-
With black and white conversions, play with contrast, clarity, and grain sliders to accentuate textures.
-
When sharpening, use masking to only apply it to edges so noise in flat areas doesn’t get amplified.
-
Crop images according to compositional principles like the rule of thirds. Tighten up empty space.
-
Use radial and graduated filters to darken distractions like bright backgrounds behind trees.
Take time to finesse important images in post-production. Subtle moves make a big difference. Enhancing the best qualities of your olive tree photos will give them serious wow factor.
Finding Stunning Olive Tree Photo Locations
Iconic olive groves and orchards worldwide make excellent photography destinations. Here are some top spots:
Greece – Hillsides on the island of Santorini overflow with whitewashed homes nestled among olive trees and vineyards that cascade toward the sea. Their twisted shapes beautifully frame ocean views.
Italy – The UNESCO protected olive groves of Val d’Orcia in Tuscany contain ancient trees with knobby trunks dotting the idyllic hilly countryside. Nearby Puglia hosts millions of olive trees as well.
Spain – Andalucia is carpeted in olive orchards, many featuring contorted older trees with thick knotty trunks that make great photographic subjects.
Israel– The Garden of Gethsemane’s gnarled olive trees in Jerusalem have immense religious and historical significance, with some estimated to be over 2,000 years old. Their expressive forms draw photographers.
California – Sonoma and Napa Valley’s wine country contains many lush olive groves with orderly rows of younger trees contrasting with historic giant trees.
South Africa – Olive orchards blanket the Western Cape, with the area around the Breede River Valley containing picturesque old growth specimens.
Seek out renowned olive growing regions like these for incredible photographic opportunities. Exploring groves by foot reveals endless compositions. Every tree has unique character offering creative possibilities.
Why Olive Trees Make Great Subjects
What is it about olive trees that makes them so appealing to photographers? Here are a few reasons they make such great subjects:
Distinctive Form– The olive tree’s gnarly trunk and billowing canopy of silvery green leaves has an instantly recognizable silhouette. Other trees don’t have quite the same graceful form.
Textural Bark-Years of growth result in thick dark furrows and knots in olive tree bark that look beautiful in close up detail shots. The patterns make great graphical elements.
Symbolic Meaning-As a symbol of peace, wisdom and longevity, the olive tree carries deeper significance. Images of it evoke these attributes.
Geographic Connection– Olive trees immediately signal Mediterranean and Middle Eastern locales. Photos of them convey a sense of place.
Range of Color– Olive trees showcase a nice palette ranging from silver and pale green to deep green leaves and black ripe olives with brown wooden hues.
Seasonal Interest– They look great year round but are especially photogenic blooming or bearing fruit. Olives themselves introduce pops of color.
Historic Significance-Some olive trees are ancient, lending them importance. Their age is embodied in the highly textural bark and twisted growth.
Photographers are drawn to olive trees because they are loaded with aesthetic and symbolic appeal. Their instantly recognizable look makes them natural photographic muses.
Final Tips for Successful Olive Tree Photography
Here are a few final pointers to help you master olive tree photography:
-
Observe how the lighting and look of the trees changes at different times and seasons. Return multiple times to experience the variations.
-
Move around the trees and look for interesting ways to frame compositions using the branches and surrounding scenery. Fresh angles make better shots.
-
Set up your tripod to allow for multi-shot panoramas, HDR sequences, and focus stacking to overcome technical hurdles when photographing such intricate natural subjects.
-
Photograph some specific spots year after year to document the trees aging and changing over seasons and years.
-
Talk to local olive growers to learn the history of the trees and gain access to the best groves not visible from the roadside.
-
Wait for ideal weather conditions like moody fog, golden hour light, or stormy skies to capture the trees in magical atmosphere.
-
Leverage weathered old olive trees as beautiful natural foregrounds in landscape images. They anchor the composition nicely.
With persistence and creativity, your photos will reveal the true magnificence of the olive tree. They have been photographic muses for generations, always offering new ways to capture their splendor.
Growing Fruiting Olive Trees
The original species of olive trees were native to Syria and Asia Minor, but theyve been cultivated for thousands of years, and the most well-known varieties are now attached to the regions where they were principally developed and grown. These subtropical regions offer the same kind of climate that supports the growth of wine grapes, but olives require even more care and take much longer to mature. However, olives tend to live and produce fruits for hundreds of years, so the time investment is worth it.
Olive trees are not grown from seed. Theyre either started from root or branch cuttings or are grafted onto other rootstock or trees. Olive trees tend to be self-pollinating, but planting two varieties will improve pollination and productivity.
The edible olive “fruit” is not a traditional fruit but a drupe—a fleshy structure containing a single stone-like seed (like peaches and cherries). When compared to other drupe fruits, olives are relatively low in sugar and high in oil content. All olives start green and gradually ripen to a darker brown, reddish-purple, or black. The riper the olive, the darker the color. Ripeness also affects the flavor and texture. Green olives retain a firm texture and a fruity, nutty flavor. As olives ripen, they soften to a meaty texture and a more complex flavor.
The fruits dont all ripen simultaneously, making harvesting labor-intensive. Since olives are usually picked by hand, they are only picked when they are ready and aren’t dropped or hit on the ground. Olives on a fully grown tree can weigh anywhere from 20 to 100 pounds, depending on their size and type.
Once picked, olives for the table are generally cured in brine for up to one year, which sweetens them for eating. They also can be dry-cured in salt, rinsed, and cured in olive oil. There are other curing methods, but theyre normally used in commercial operations, not at home.
Here are varieties of fruiting olive trees that are often available in the United States.
- 01 of 13: Arbequina – Photo: robypangy / Getty s The popular Arbequina olive (Olea europaea Arbequina) comes from Catalonia in Spain and is often suggested for growing in pots because it stays small there. Its one of the more cold-tolerant olive varieties. The fruits are small and light brown. They are firm and have a mild, fruity flavor, which makes the oil very fruity. It may take up to four years before it bears fruit, but it usually does in two years. Native Area: SpainUSDA Growing Zones: 8-10Height: 15–30 feetSun Exposure: Full .
- 02 of 13 Mission Olives (Olea europaea Mission) can handle cold weather better than most olive trees It’s thought that they came from Spain, but they’ve been grown in California since the 1700s, when Franciscan missionaries brought them there. The rest of the olives are either brine-cured while they are green or oil-cured when they are black to make a fresh, mild-flavored snacking olive. They take three to seven years to mature for fruiting. It comes from California (via Spain) and grows best in USDA Growing Zones 7–10. It gets full sun and is 25–30 feet tall.
- 03 of 13 Picholine Credit: Paolo_Toffanin / Getty s The French Picholine (Olea europaea Picholine) olive is another good choice for growing in pots. It is crunchy and has a spicy, nutty taste. This is the most common type of olive in France. It’s great for snacking, cooking, and making bland oil. Olives are picked green to eat, but they can turn black if they are going to be used for oil. Most trees don’t bear fruit for about five years after they are planted. Native Area: FranceUSDA Growing Zones: 8–10Height: 20–30 feetSun Exposure: Full .
- 04 of 13: Manzanilla (Olea europaea Manzanilla) – Picture: Thanatham Piriyakarnjanakul / Getty s. If these big green olives look familiar, it’s because they are the most popular olive in the United States. They’ve been cured in salt water and are often filled with pimientos or tossed with garlic and olive oil. It usually takes them two to four years before they bear fruit. The Manzanilla olive tree is a beautiful landscape tree with a crown that hangs down and a trunk that is gnarled. It produces a lot of fruit but grows slowly. People like it as a small shade tree and because its olives taste good. This plant can be hurt by cold weather and diseases like olive knot and verticillium wilt, though. Native to SpainUSDA Growing Zones: 8–10Height: 20–30 feetSun Exposure: Full Scroll down to see the next five plants.
- Olive trees from central Greece called Amfissa (Olea europaea Amfissa) produce brownish-purple drupes. Picture credit: Aldo Pavan/Getty, 05 of 13. Usually, the olives are cured in brine, which gives them a mild fruity flavor. However, a citric acid brine is sometimes used instead, which gives the olives a sharp, citrusy taste. These trees grow quickly and spread out. They bear fruit every three to four years. The olive tree is native to central Greece and grows in USDA growing zones 9–11. It is 20–30 feet tall and gets full sun. If you want to know what kind of olive tree you have, look closely at its leaves and fruits. The leaves of some olives, like Leccinos, are long and silvery, while the leaves of Arbequinas are dark green and oval-shaped. Similarly, the look of the fruits is another indicator. Leccino olives are oval-shaped, medium-sized, and dark green when ripe. Instead, Arbequinas are small, round, and turn a reddish brown color when they’re ready.
- Picture 6 of 13: Nocellara Del Belice. Image credit: couleur / Pixabay. The bright green olives sold as Castelvetrano (Olea europaea Nocellara Del Belice) come from the Nocellara del Belice cultivar in Sicily. Their mild flavor and buttery texture make them some of the best table olives, and people all over the world love them. The tree doesn’t get many pests or diseases, bears fruit every five years, and has a dense crown that makes it a small shade tree. Native Area: SicilyUSDA Growing Zones: 8–11Height: 15–20 feetSun Exposure: Full .
- Gordal Sevillano (Olea europaea Gordal Sevillano) is a firm, chubby olive from Spain that can be eaten by itself as a snack. Picture credit: Rechelle Alcances / Getty s. Olives are often filled with nuts, cheese, or fruit because the flesh is very soft. The look of olive trees is nice and willow-like, so they look good in landscapes. With age, the trunk becomes gracefully gnarled. It is native to Spain and grows best in USDA growing zones 8–11. It is 20–30 feet tall and gets full sun.
- 08 of 13: Kalamata (Olea europea Kalamata) Credit: etiennevoss / Getty s The Kalamata is one of the most well-known types of olive. These well-known Greek olives look like almonds and have shiny, dark purple skin. Most of the time, they’re kept fresh in olive oil, but sometimes they’re in red wine or red wine vinegar. Kalamatas taste a bit smoky and fruity, and they can be used in any recipe that calls for black olives. The trees grow straight up and outward, and their leaves are a bit bigger than those of most olive tree types. However, it doesnt do well in extremely hot conditions. It usually bears fruit within four to five years. USDA Growing Zones 7–10; native to southern Greece; 20–25 feet tall; full sun. Continue to 9 of 13 below.
- 09 of 13 Niçoise Credit: Canva / Designer from CC0 The small black Niçoise olive (Olea europaea Niçoise) is a mainstay in southern France. It has a strong, smoky, herbal taste and is used in tapenade and Niçoise salad. Even though they are from France, these olives are actually from Liguria in Italy. They were picked when they were fully ripe and dark brown, and they were then brine-cured with different herbs. The trees do best in hot, dry places. They have green leaves that are wider than most olive types and branches that slightly fall off. Edible olives appear within two years. Native Area: ItalyUSDA Growing Zones: 8–11Height: 25–30 feetSun Exposure: Full .
- 10 of 13 Frantoio Olive Tree Background: Francesco Vignali/Getty Images The Frantoio (Olea europaea Frantoio) olive tree comes from Tuscany and makes dark, oval drupes that are great for making oil and eating. This tree grows quickly and has pretty silvery leaves that make any landscape more interesting to look at. Edible olives are produced in just one to two years. Native Area: ItalyUSDA Growing Zones: 8–11Height: 20–25 feetSun Exposure: Full .
- 11 of 13: Leccino olive trees (Olea europaea Leccino) are a popular variety in Tuscany because they can be used in a lot of different ways. They can be grown in the ground or in pots, and in two years they produce a lot of olives. When grown outside, they can handle temperatures as low as 20 degrees and don’t mind being dry. These trees need to be cross-pollinated with another tree, like an Arbequina, before they can bear fruit. Native Area: ItalyUSDA Growing Zones: 8-11Height: 10-30 feetSun Exposure: Full .
- Twelve of thirteen: Cailletier. Picture: INRA DIST from France / Wikimedia Commons / CC BY 2. 0. Cailletier (Olea europaea Cailletier) olive trees can reproduce on their own, but they make more fruit when they pollinate other olive trees. In two to four years, this tree should start to bear black table olives. The oil tastes like almond and hazelnut. This variety is unfortunately vulnerable to olive fly, olive scale, and olive knot, but it can handle cold weather. If you want to buy this tree, find a nursery that uses cultivars that are resistant to pests and diseases. Native to FranceUSDA Growing Zones 8–11Height: 25–30 feetSun Exposure: Full Scroll down to see the next 13 plants.
- Thirteen of Thirteen: Koroneiki Olives (Olea Europea Koroneiki): These olives come from the Greek island of Crete and have been grown for more than 3,000 years. People love their oil, which is dark green, non-acidic, and tastes like fresh, fruity green olives. These trees tolerate drought and humidity. Many Koroneiki begin producing fruit after three years. Native Area: GreeceUSDA Growing Zones: 8-11Height: 15-20 feetSun Exposure: Full .
Growing olives can be a tempting proposition, but the size of the trees, the number of fruits, and the work required to maintain a healthy tree can be daunting. Since olive trees have a long life, give it considerable thought before you plant one or more in your yard.