Composting is a wonderful way to recycle organic waste and create a nutrient-rich fertilizer for your garden But to get beautiful, sweet-smelling compost, you need more than just a pile of plant debris Proper layering is essential for fast, effective composting.
When you build a layered compost bin, you create the ideal environment for beneficial microbes to thrive. These tiny decomposers require the right balance of ingredients to work their magic. With strategic layering, you can give them everything they need while deterring pests and minimizing odors.
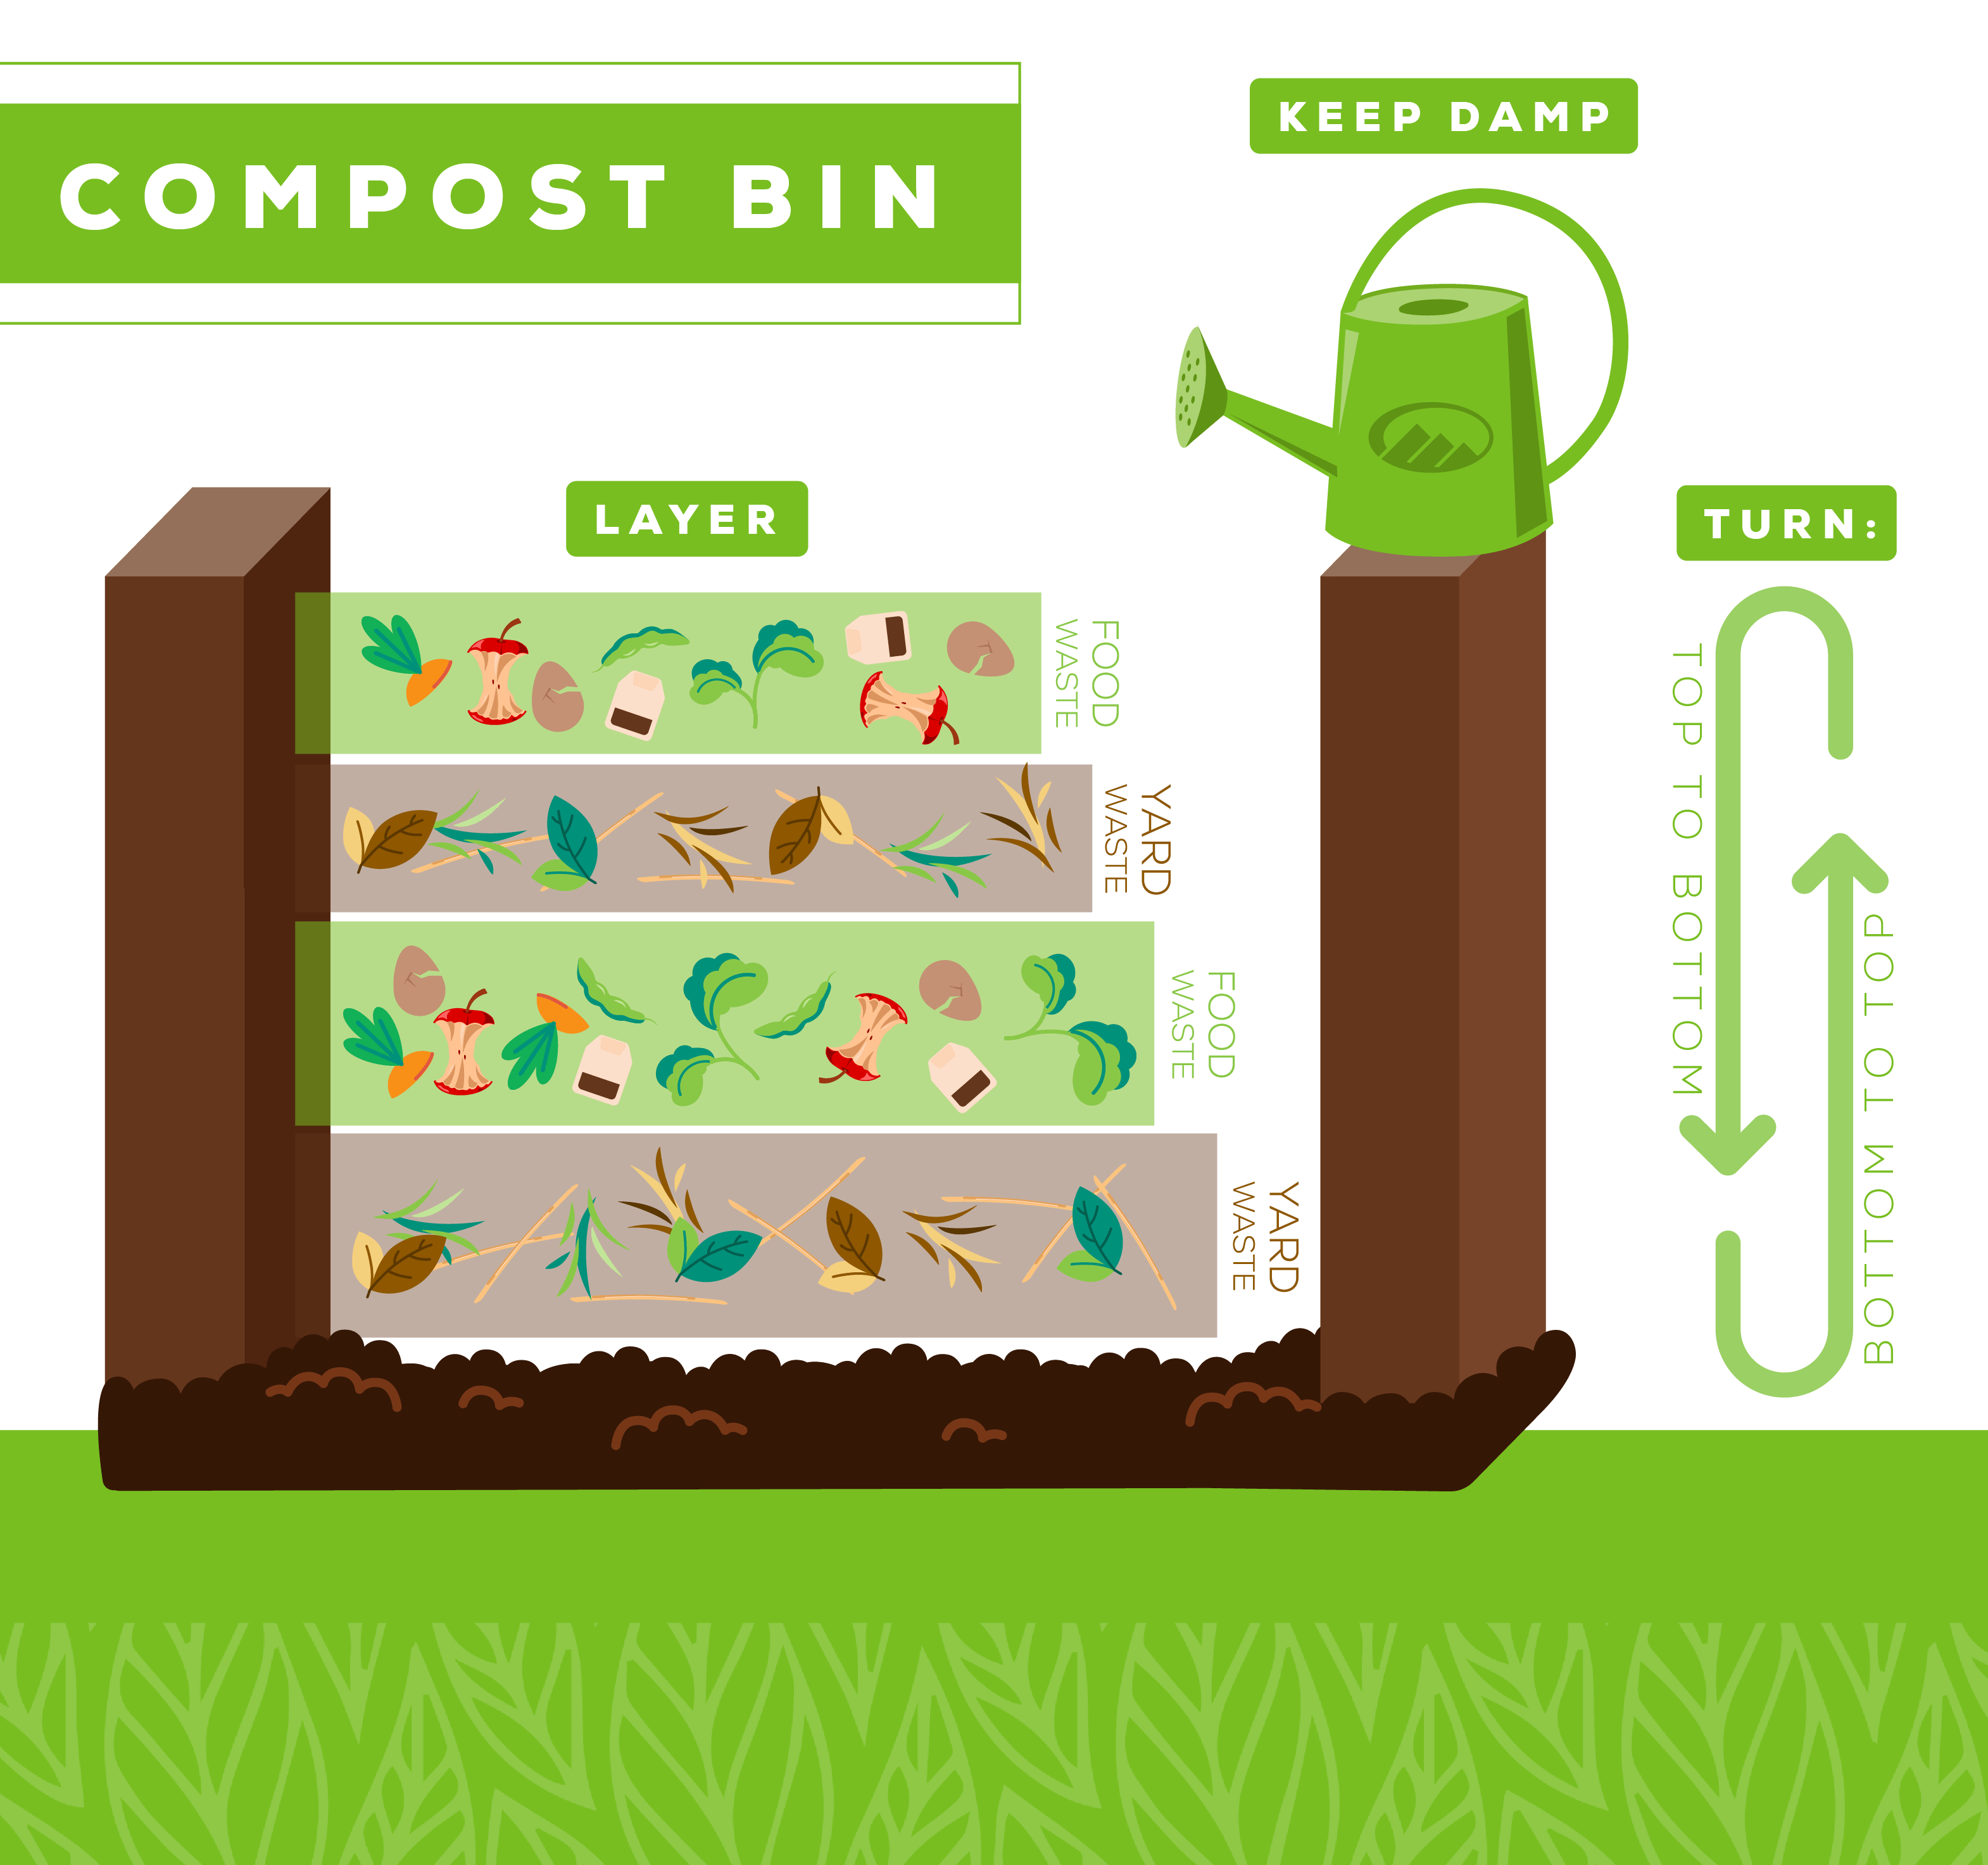
This article will talk about the different parts that make up a good compost bin. If you follow these steps for layering compost, you’ll have dark, crumbly compost in no time!
Why Layering is Important
Layering provides four key benefits for compost:
- It balances carbon and nitrogen in the optimal C:N ratio of 25-30:1.
- It allows air circulation for aerobic decomposition.
- It absorbs and retains moisture.
- It facilitates gradual breakdown from the outside edges inward.
The right amounts of “browns” (materials high in carbon) and “greens” (materials high in nitrogen) are needed to feed the microbes and keep the chemical reactions going in composting.
By layering browns and greens in the right amounts, you can keep your bin from smelling bad, getting slimy, or getting stuck. Thick layers of dry, coarse matter ensure oxygen flow. And alternating wet and dry layers regulates moisture.
Strategic layering makes it easy to mix materials as you add them. This makes a “lasagna” of ingredients that will eventually turn into compost.
Base Layer for Aeration and Drainage
The foundation of your layered compost pile should be coarse, woody materials. Twigs, branches, corn stalks, or straw work perfectly for this base layer.
Aim for 6-8 inches of bulky matter. The rigid structure allows air to penetrate from underneath, feeding oxygen up into the compost. This base layer also facilitates drainage, so excess moisture can escape.
If you don’t have access to sticks or branches, substitute straw, wood chips, or even shredded cardboard. Avoid matted layers that can restrict airflow.
This coarse foundation is the first step to creating a well-aerated compost bin. Proper oxygen flow prevents anaerobic conditions, which cause unpleasant odors.
Browns Provide Carbon and Structure
Once your base layer is in place, add a layer of “browns” 2-4 inches deep. Browns are carbon-rich dry matter like leaves, wood shavings, sawdust, or shredded paper.
Leaves from deciduous trees like oak, maple, and ash work exceptionally well. They break down easily compared to evergreen needles. Shred or crumple them first to maximize surface area.
Browns provide a carbon source to balance the high nitrogen content of fresh greens. Their porosity allows oxygen to enter and moisture to escape. Browns also absorb odors and deter pests from digging for scraps.
Greens Supply Nitrogen and Moisture
Now it’s time to add nitrogen-rich fresh matter, known as “greens.” This includes grass clippings, plant trimmings, fruit and vegetable scraps, coffee grounds, and manures.
Greens provide moisture, nitrogen, and easily accessible carbons to feed the decomposing microbes. Limit layers to 1-2 inches thick to prevent compacting. Chop or shred large discards.
Avoid thick mats of grass and excessively wet waste that can force out air. Never include meat, bones, oils or dairy, which can attract pests.
Thin, distributed layers of greens deliver an optimal C:N ratio for rapid, odor-free decomposition when combined with browns.
Soil and Compost Inoculate with Microbes
Sprinkle 1-2 inches of finished compost or garden soil between the layers of greens and browns. This introduces native bacteria, fungi, worms, and other beneficial life into your bin.
Soil microorganisms are perfectly adapted to break down organic matter from your local environment. Compost contains concentrated populations of these decomposing critters to jump start the process.
Additional Activators Can Give a Boost
If you want to give your compost a boost, add thin layers of compost activators every 12-18 inches. This can include:
-
Manure from herbivores like horses, cows, goats or rabbits. Must be aged at least 6 months.
-
Coffee grounds and used tea leaves or bags. Provide nitrogen and tannins.
-
Wood ashes (in moderation) for potassium, phosphorus, and micronutrients.
-
Commercial compost inoculant with bacteria, fungi, and enzymes.
These natural accelerants inoculate layers with concentrated nutrients and microorganisms. Follow package instructions when using commercial products.
Top it Off with a Carbon Layer
Once your bin is almost full, finish it off with a 4-6 inch layer of high-carbon browns. Shredded leaves, sawdust, or straw work perfectly for this.
A carbon cap prevents odors, wicks away excess moisture, and promotes aerobic conditions. It also provides insulation to retain heat in the decomposing center.
Topping with carbon is the final flourish to your layered compost lasagna! Now let the magic of decomposition turn your waste into black gold.
Troubleshooting Layered Compost Bins
Even with proper layering, compost can run into problems. Here are some tips if your bin has odors, pests, or other issues:
-
Rotten egg smell – Too much nitrogen-heavy green matter. Add more browns.
-
Ammonia smell – Excess greens. Add additional carbon materials.
-
Lack of heat – Mix in fresh grass clippings or a nitrogen booster. Turn the pile.
-
Too dry – Add water or high-moisture greens like fruit scraps.
-
Pests – Bury food, cover with soil, install wire mesh to enclose pile.
With a little adjustment, your layered compost will be back on track in no time!
Convenient Lasagna Layering
For easy composting, try the “lasagna method” of layering. This involves:
-
Building layers in a bin, alternating greens and browns.
-
Situating bins near a pile of ready browns for convenient layering.
-
Limiting green layers to 4 inches from bin edges to deter pests.
-
Covering all food scraps fully with carbon material.
-
Letting compost finish over 6-12 months with no turning needed!
Lasagna layering streamlines composting with no mess or hassle. Just add materials as they become available. In less than a year, you’ll have finished compost!
Follow Nature’s Lead
In nature, organic matter accumulates in layered strata on the forest floor. This natural layering facilitates steady, aerobic decomposition.
By mimicking these conditions in your backyard bin, you provide the ideal habitat for composting organisms. Proper proportions, moisture, and aeration give microbes everything they need to work their magic.
Strategic layering results in an evenly mixed, homogeneous finished product. Your plants will reward you with more blooms and bountiful harvests when fed this hand-crafted, nutrient-dense compost.
With a properly layered compost bin, you can conveniently convert yard trimmings, kitchen scraps, and other organic “waste” into a valuable soil amendment. Your garden will reap the benefits of this black gold.
So grab a pitchfork, lay down that base layer, and start stacking your compost lasagna today!
Frequently Asked Questions
What is layering in composting?
Compost layering involves adding alternating thin layers of greens and browns in the proper ratios to create ideal conditions for aerobic decomposition. It balances moisture, provides nutrition for microbes, and allows air circulation.
How many layers should a compost bin have?
Most compost bins utilize at least four layers:
- Coarse woody base layer
- Browns like leaves or sawdust
- Greens such as food scraps
- Finishing layer of carbon materials
Additional supplemental layers can include compost boosters, inoculants, and moisture.
How thick should each layer be?
- Base layer: 6-8 inches
- Browns: 2-4 inches
- Greens: 1-2 inches
- Finishing layer: 4-6 inches
Thinner layers provide the highest surface area for microbes to access nutrition and oxygen.
Can I just mix everything together?
It’s fine to combine materials without strict layering. But layering makes it easier to achieve the right carbon-nitrogen balance and prevent compaction. Mixing the pile occasionally still provides adequate blending.
How often should I add layers?
Add new layers of greens and browns every time you have a batch of fresh trimmings or food waste to contribute. Layering makes composting an ongoing process.
When can I use my finished compost?
Depending on climate, volume, and materials, compost takes 2-4 months to fully mature. Finished compost is dark, crumbly, and earthy-smelling. Use in garden beds or as a mulch.
Proper layering is the key to fast, effective composting. Follow these guidelines for constructing the ideal habitat for thriving decomposers. With the right layers, you’ll create sweet, nutrient-rich compost your plants will love.
Step 4: Add a Layer of Green Materials
Now add a layer of green materials like kitchen scraps (vegetable peels, fruit scraps), grass clippings, and coffee grounds. This layer should be about 2-3 inches thick.
Green materials provide nitrogen, which is essential for the growth of the microbes that break down the compost. They add necessary moisture and help heat up the compost pile as they decompose.
Step 2: Begin with a Rough Base Layer
Start with coarse, bulky materials like twigs, small branches, or straw. These should be loosely piled to a depth of about 6 inches.
This base layer allows air to flow into the bottom of the compost pile, which is crucial for aerobic decomposition. It also helps with drainage, preventing the materials above from becoming waterlogged.