Hey there fellow garden lovers! If you’ve got bee balm (or Monarda as some fancy folks call it) blooming in your yard, you’re in for a treat. This herb, sometimes dubbed bergamot for its citrusy vibe, ain’t just a pretty face with those vibrant pink, red, or purple flowers. It’s a powerhouse of flavor and healing properties, and drying it lets you keep that magic around all year long. I’ve been tinkering with drying bee balm for a while now, and lemme tell ya, it’s a game-changer for teas, remedies, or even just sprucing up your home with some herbal charm. So, grab a cuppa somethin’ and let’s dive into how to dry bee balm like a pro—or at least like someone who’s made all the mistakes so you don’t hafta!
Why Bother Drying Bee Balm?
Before we get our hands dirty, let’s chat about why drying bee balm is worth your time Fresh bee balm is awesome, no doubt, but it don’t last forever. Drying it locks in those essential oils that give it that minty-citrus kick and medicinal mojo Whether you’re planning to whip up a soothing tea for a scratchy throat, toss it into a salad for a zesty punch, or craft some potpourri that smells like a summer dream, dried bee balm is your ticket. Plus, if you’re like me and hate seein’ your garden goodies go to waste, preserving it feels like givin’ Mother Nature a high-five.
Here’s a quick peek at what dried bee balm can do for ya
- Culinary Uses: Add it to teas, lemonades, or even sprinkle into baked goodies for a unique flavor.
- Medicinal Magic: It’s got antibacterial and antifungal vibes, great for easing colds or minor skin irritations.
- Crafty Stuff: Perfect for potpourri, sachets, or even homemade soaps if you’re feelin’ extra DIY.
Step 1: Harvesting Bee Balm the Right Way
First things first, you need to choose your bee balm at the right time. Timing is everythin’ here, folks. I found this out the hard way when I cut mine too late and got sad, tasteless stalks. Early to mid-morning is the best time to harvest, just after the dew has dried but before the sun gets too hot and destroys the oils. Find stalks where the first few flowers are just starting to open. That’s when the taste and strength are best.
Here’s how I do it:
- Gear Up: Grab some clean, sharp shears or scissors. Dirty or dull tools can mess up the stems, and nobody wants funky black spots on their harvest.
- Choose Wisely: Pick healthy stalks with vibrant leaves and flowers. If it looks wilted or weird, toss it to the compost pile.
- Cut Smart: Snip just above a leaf node, leavin’ a bit of stem. This keeps the plant happy for more growth later.
- Strip Extras: Peel off any damaged or lower leaves near the base. We’re only dryin’ the good stuff.
I usually head out to my patch with a lil’ basket, feelin’ like some old-timey forager. There’s somethin’ real satisfyin’ about gatherin’ your own herbs on a quiet mornin’. Make sure it’s a dry day—wet leaves can get moldy during drying, and that’s a big ol’ nope.
Step 2: Pick Your Drying Method
Now that you’ve got your bee balm bounty, it’s time to dry it out. There’s a few ways to go about this, dependin’ on your setup and how quick you need it done. I’m gonna walk ya through the main methods I’ve tried, startin’ with the easiest and most old-school one. No matter which ya pick, the goal is to dry it slow and gentle to keep those tasty and healing oils intact.
Method 1: Air Drying (My Go-To)
This is the way I usually roll, ‘cause it’s simple and don’t need no fancy gear. Air drying is perfect if you’ve got some patience and a good spot in your house.
- Bundle It Up: Gather 5-10 stems together and tie ‘em with a rubber band or some twine. Don’t make the bunch too thick, or the middle won’t dry proper.
- Hang ‘Em High: Hang the bundles upside down in a warm, dry place with good airflow. I use a corner of my garage or a spare closet. Keep it outta direct sun—sunlight can bleach the color and zap the flavor.
- Wait It Out: Let ‘em hang for 2-3 weeks. Check now and then to make sure they ain’t gettin’ moldy. You’ll know they’re done when the leaves crumble easy and the stems snap when bent.
I’ve got a lil’ hook in my shed where I hang mine, and I swear it makes the whole place smell like a fancy spa. Just be patient—rushin’ this can leave ya with damp herbs that spoil.
Method 2: Using a Dehydrator (Quick ‘n’ Easy)
If you’re like my buddy who’s got no patience for waitin’, a food dehydrator is your best pal. I borrowed one once and was shocked at how fast it worked.
- Lay It Out: Spread the leaves and flowers in a single layer on the dehydrator trays. Don’t overcrowd ‘em.
- Set the Temp: Crank it to a low setting, between 95°F and 115°F. Too hot, and you’ll cook the flavor right outta them.
- Check Often: It usually takes 8-24 hours. Peek every half hour or so near the end to avoid over-drying. They’re ready when crispy.
This method is awesome if you’ve got a big batch and wanna get it done pronto. Just don’t leave it unattended too long—I overdid mine once and ended up with herb dust. Whoops!
Method 3: Oven Drying (Last Resort)
If you’re in a pinch and ain’t got a dehydrator, your oven can step in. But lemme warn ya, it’s tricky to get right, so watch it like a hawk.
- Prep the Tray: Spread the leaves on a baking sheet lined with parchment paper. Keep ‘em in a single layer.
- Low and Slow: Set your oven to the lowest temp, usually 150-200°F. Prop the door open a crack to let moisture escape.
- Monitor Closely: Check every 15 minutes or so. It takes about 1-2 hours, but it can scorch quick if you ain’t careful.
It’s easy to mess up, so I only use this when I have to. The last time I tried, my dog started barking, and when I came back, the bee balm was a little toasty. Not ideal, y’all.
Method 4: Freeze Drying (Weird but Works)
People have done this before, but I thought it was interesting, so I gave it a try. It’s more for long-term storage than everyday drying.
- Freeze It: Lay the leaves on a baking sheet and pop ‘em in the freezer overnight till they’re solid.
- Store Right: Once frozen dry, scoop ‘em into an airtight container quick so they don’t soak up moisture.
I ain’t gonna lie, this ain’t my fave. It works fine, but the texture isn’t as good as when it’s dried naturally. Still, if you’ve got freezer space, it’s an option.
Method 5: Screen Drying Outdoors (Weather Permittin’)
If it’s hot and dry where you are, you can dry bee balm outside on screens. I’ve done this on super sunny days with decent results.
- Set Up Screens: Use a mesh screen or even an old window screen propped up on blocks for airflow.
- Spread Thin: Lay the leaves and flowers out in a thin layer. Put it in full sun but not scorching heat.
- Bring In at Night: Haul it indoors when the sun dips or if it gets humid to avoid dew messin’ things up. Stir occasionally.
This can take 1-2 weeks, dependin’ on your climate. I like the idea of lettin’ nature do the work, but it’s risky if the weather turns on ya.
Step 3: How to Know When Bee Balm Is Dry
Alright, so how do ya tell if your bee balm is ready to store? This part tripped me up at first—I kept thinkin’ it was done too soon and ended up with moldy bits. Here’s the trick:
- Leaf Test: Pinch a leaf. If it crumbles easy, you’re golden.
- Flower Check: Flowers should feel crispy and brittle, not soft.
- Stem Snap: Bend a stem. If it snaps clean without bendin’, it’s dry. If it’s still flexible, give it more time.
If it feels cool or damp to the touch, it ain’t ready. Keep dryin’ or you’ll regret it when you open a jar of funky herbs later. Trust me on this one.
Step 4: Storing Your Dried Bee Balm
Once it’s dry, don’t just chuck it in a random bag and call it a day. Proper storage keeps your bee balm fresh and potent for up to a year. I’ve got a lil’ shelf in my pantry dedicated to my herb stash, and here’s how I keep it safe:
- Pick the Right Container: Use airtight glass jars or dark, opaque plastic bags. Light and air are the enemies here—they’ll degrade the oils and flavor.
- Keep It Cool ‘n’ Dark: Store in a cool, dry spot away from sunlight. My pantry cupboard works great, but a basement shelf could do too.
- Label It: Slap a label on with the date you harvested. I forgot once and mixed up my bee balm with oregano. Not a tasty tea, lemme tell ya.
- No Fresh Mixin’: Don’t store fresh and dried herbs together. Moisture from fresh stuff can ruin your hard work.
Check on it every now and then. If ya see mold or smell somethin’ off, toss it. Better safe than sorry with this stuff.
Bonus: What to Do with Dried Bee Balm
Now that you’ve got a stash of dried bee balm (or Monarda, if we’re gettin’ technical), let’s talk about puttin’ it to use. I love experimentin’ with this herb, and there’s a ton of ways to enjoy it.
In the Kitchen
- Teas and Drinks: Steep whole leaves in hot water for a minty tea that soothes a sore throat. Or toss into iced lemonade for a summer refresher.
- Cookin’ Flavors: Crumble into sauces, especially tomato-based ones, or sprinkle over chicken and fish. It pairs wicked good with veggies like corn or zucchini.
- Infusions: Infuse into olive oil or vinegar by lettin’ it steep for a few weeks in a dark spot. Strain and use for dressings or marinades. I’ve gifted these, and folks go nuts for ‘em.
For Health
- Home Remedies: Make a tincture or salve for minor cuts or skin irritations. It’s got a natural antiseptic kick. I keep some handy for garden scrapes.
- Fever Fighter: As a diaphoretic, it helps ya sweat out a fever. A hot tea with dried leaves works wonders when you’re feelin’ under the weather.
Crafty Ideas
- Potpourri: Mix with other dried flowers for a fragrant bowl that makes your house smell amazin’.
- Sachets and Soaps: Stuff into little bags for drawers or add to homemade soap for a personal touch. I made some for my mom last Christmas, and she loved it.
Common Mistakes to Avoid (I’ve Made ‘Em All)
I ain’t perfect, and I’ve botched dryin’ bee balm more times than I care to admit. Here’s a heads-up on what not to do:
- Harvestin’ Too Late: Waitin’ till the flowers are all open means less flavor. Pick early for best results.
- Wet Leaves: Don’t harvest after rain or skip dryin’ off dew. Mold loves that moisture.
- Sun Dryin’ Wrong: Direct hot sun bleaches and burns the herb. Keep it shaded if dryin’ outside.
- Bad Storage: Usin’ clear jars on a sunny shelf? Nope. You’ll lose potency fast.
- Over-Dryin’: Leavin’ it too long in an oven or dehydrator turns it to dust. Check often!
I once left a bundle in my attic thinkin’ it’d dry faster with the heat. Came back to a moldy mess ‘cause there was no airflow. Lesson learned, y’all.
Tips for Growin’ Bee Balm to Dry Later
If you ain’t got bee balm yet but wanna start, here’s a quick rundown on growin’ it for future drying. I’ve got a patch in my backyard that just keeps givin’ every year.
- Location: Plant in full sun to partial shade with well-drainin’ soil. It ain’t too picky.
- When to Plant: Sow seeds in spring after frost danger’s gone. It’s hardy in zones 3-10, so most places can handle it.
- Space It Out: It grows up to 3 feet tall and spreads like crazy. Give it room or stick it in a container if ya don’t want it takin’ over.
- Care: Water regular but don’t drown it. Deadhead old blooms to keep new ones comin’.
My fave varieties are Wild Bergamot and Scarlet Bee Balm—gorgeous colors and killer scent. Once it’s established, you’ll have plenty to harvest and dry each season.
Wrappin’ It Up
Dryin’ bee balm ain’t rocket science, but it does take a lil’ care and patience to get it right. Whether you’re hangin’ bundles in your garage like I do, usin’ a dehydrator for speed, or even tryin’ the oven in a pinch, the key is keepin’ those essential oils safe by dryin’ slow and storin’ smart. I’ve come to love this process—not just for the end result, but for the connection to my garden it brings. There’s somethin’ downright satisfyin’ about sippin’ a tea made from herbs you grew and dried yourself.
So, go on and give it a shot. Start small if ya gotta, maybe just a few stalks to test the waters. Before ya know it, you’ll have jars of dried bee balm (or bergamot, if ya wanna sound posh) ready for whatever you fancy—be it a cozy drink, a healing salve, or just a lil’ somethin’ to remind ya of summer on a cold day. Got questions or a cool way you use dried bee balm? Drop a comment—I’m all ears for new ideas to try in my own patch!
How to Harvest Bee Balm
Youll the largest harvest of high quality leaves if you gather the plant before it goes to flower. As the flowers bloom, the plant gets taller, the stems get more rigid, and the leaves are less concentrated on the plant. I look for large colonies of plants about a 1-2 feet tall, and using a scissors, I cut the top 6 inches or so off and put them in a paper bag.
When I get home, I put transfer the plants to a plastic bag and store in the fridge. You must cool down the plants after harvesting within a few hours or they will wilt and discolor, which can ruin the flavor.
If your plants are wilted from traveling, soak them in a bowl of cold water for 20 minutes or until they get bright again. Then, spin them dry and put them in a zip-top bag with paper towels around it. Freshly picked and quickly cooled, fresh bee balm leaves will keep in the fridge for at least a week.
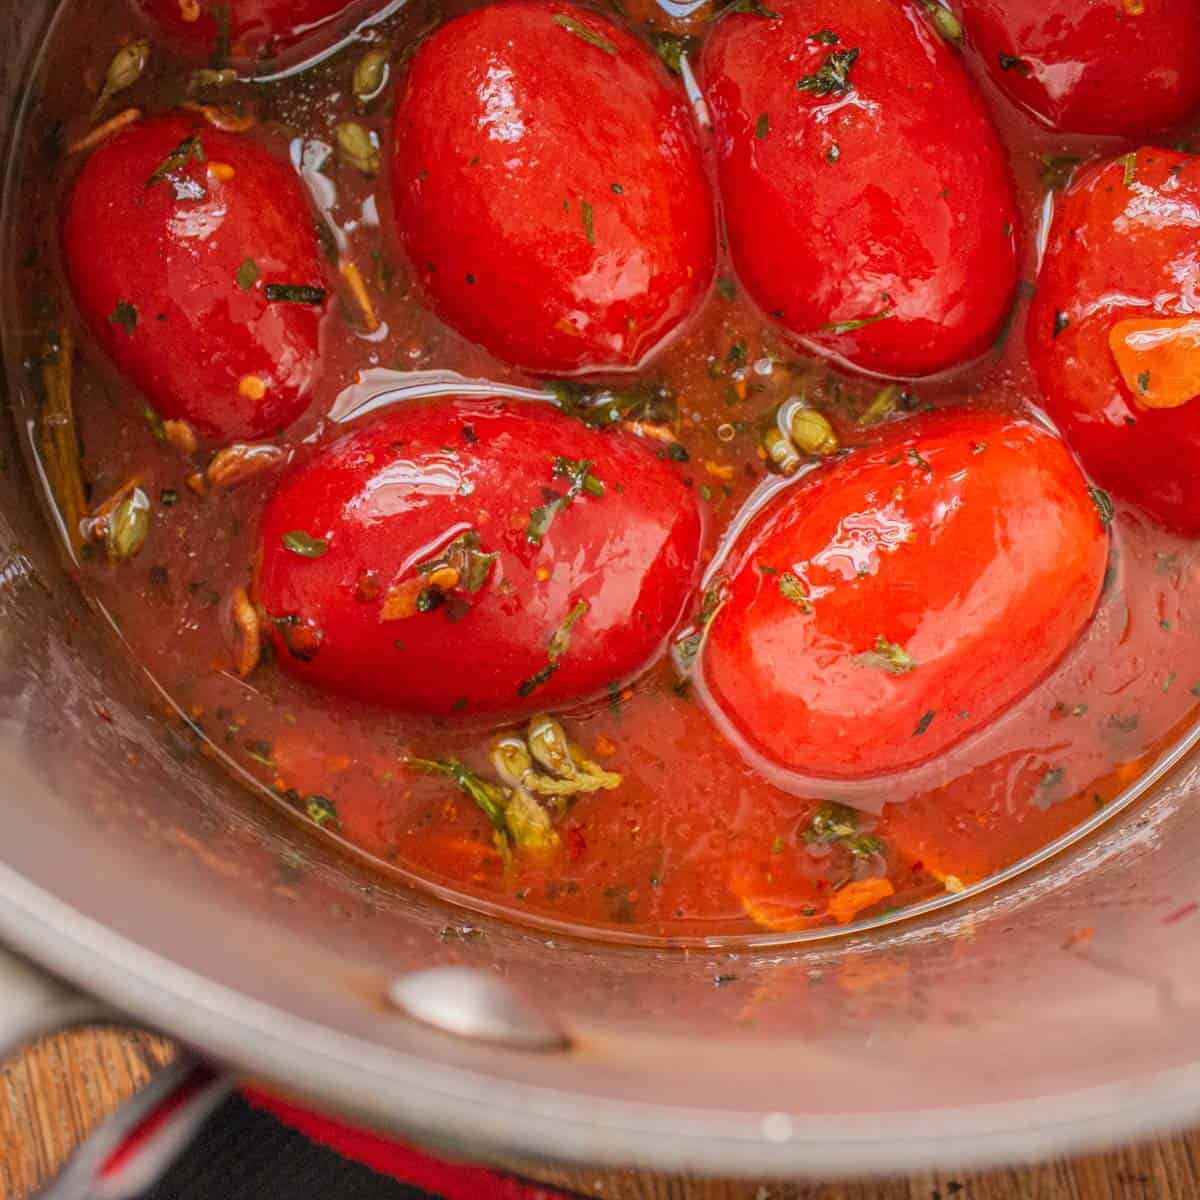
This is an incredibly versatile wild herb with many more uses than bee balm tea. The thymol means that its a great substitute anywhere youd use oregano or thyme. Some people (myself included) have started to refer to wild bergamot as “pizza plant” because it pairs so well with tomatoes, especially tomato sauce.
Theres two ways you can use bee balm leaves and flowers in cooking: fresh, and dried.
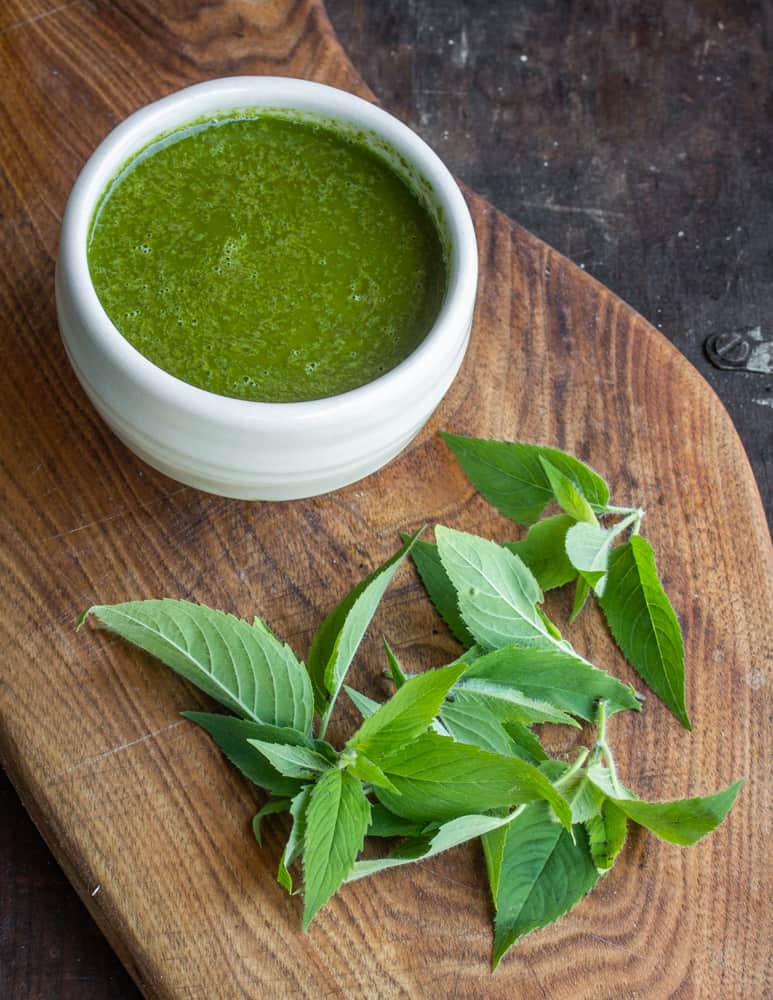
The fresh green leaves of the plant add a great flavor to sauces, especially tomato sauces, soups, marinades and vinaigrettes, and basically anywhere youd use fresh oregano or thyme. Fresh, I use the leaves to make salmoriglio sauce. Its one of my favorite things to do with the plant.
Bee balm flowers will lost some of their power after drying, so I typically use them fresh only, although they can be ok for tea.
The fact that bee balm can be harvested easily in large quantities, dry well and keep a great flavor, makes it of my favorite foraged herbs to cook with.

Just like the fresh plant, you can use the dried leaves anywhere youd use dried oregano or thyme.
There are better ways to use dried bee balm than others. You can use it anywhere you would use dried oregano. Heres a few ideas Ive tried, and some that are on the list:
- Add dried bergamot to all-purpose tomato or pizza sauce.
- You can add the dried leaves to bread dough and other baked goods.
- Mixed sliced fresh leaves or flowers into potato salad.
- You can chop the leaves up and toss them with grilled vegetables like zucchini.
- Diced eggplant should be blanched in salted water and then baked with cheese in the tomato-bergamot sauce. This makes a great side dish.
- Salt, lemon zest, crushed garlic cloves, and olive oil can be mixed together to make a marinade for chicken, pork, or fish.
- Fresh bergamot leaves have a strong flavor, but they can be used in certain ways. For my favorite recipe, see below for salmoriglio sauce.
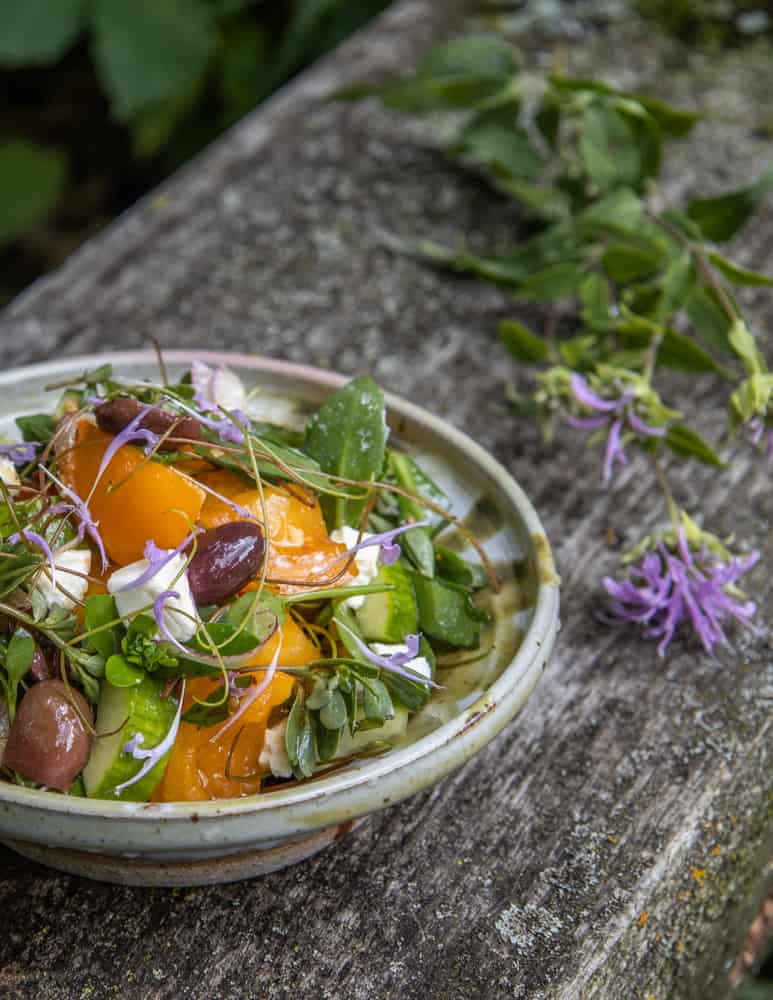
- Red fruits, like raspberries and strawberries, taste great with fresh scarlet beebalm leaves. Add some to some strawberries that have been mashed and put them on top of a panna cotta or soft cheese.
Cultivated Varieties (Scarlet Bee Balm)
For most people, Scarlet bee balm (Monarda didyma, also known as Oswego tea) is the type they’ve heard of. Scarlet bee balm resembles wild bee balm, but is typically taller.
. The most noticeable difference between the wild and cultivated variety are that scarlet bee balm has beautiful carmine-red flowers. The height and showy flowers make it a pretty garden ornamental thats good for pollinators.
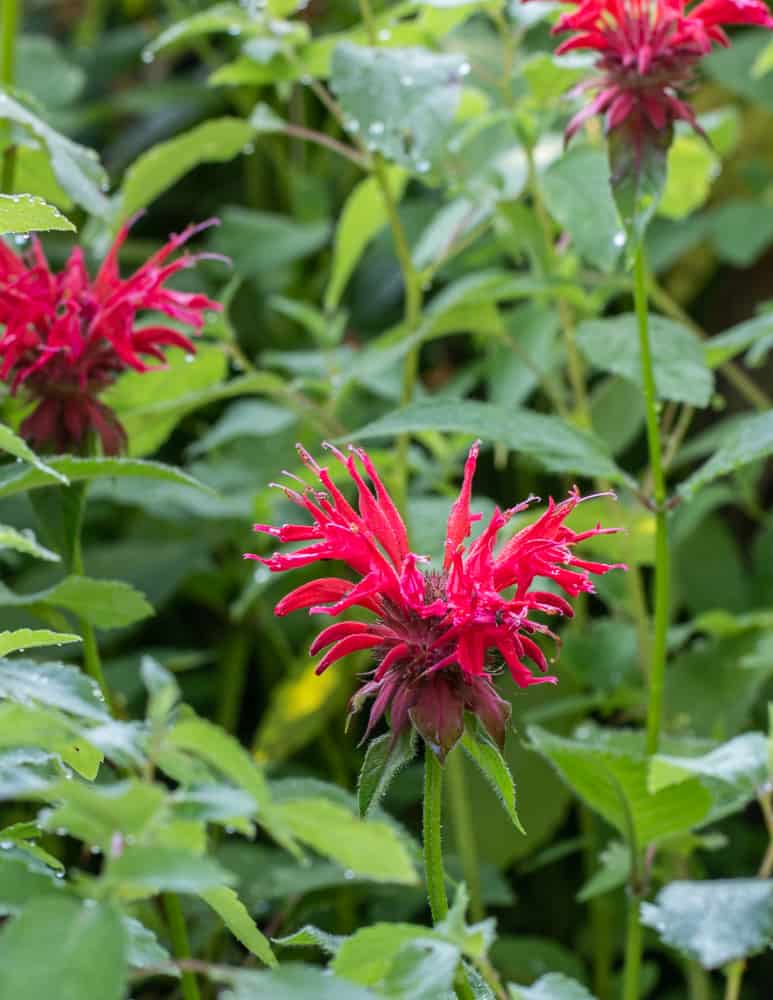
The best part about Scarlet bee balm is the flavor of the flowers. They have the flavor of thymol like wild bee balm, but mixed with notes of ripe red fruit and berries.

The fresh leaves are wonderful scattered into a salad or sprinkled on just about anything. Mixed with a hot cup of water, the dried flower petals can make a nice tea.
Unlike wild bee balm, I dont use the leaves of scarlet bee balm in cooking-only the flowers. The leaves taste slightly odd to me, and not as pleasant as the leaves of its wild cousin.
Monarda Bee Balm Drying, Grinding, and Using!
FAQ
Can you dry bee balm?
Which part of bee balm is used for tea?
The leaves and flowers of the bee balm plant are used to make bee balm tea. Both parts of the plant are infused in water to create the tea. Aug 1, 2023.
What do you do with bee balm after it flowers?
All BeeBalm should be deadheaded and all are the same. Cut off the spent bloom down to the first set of leaves. This will encourage the plant to rebloom. I have deadheaded some of mine but will be leaving some so I can gather seeds for new plants.
How to harvest bee balm for medicinal use?
The best time of day to harvest bee balm is in the morning after the dew has evaporated but before it gets too hot. This will ensure that you capture the greatest flavor and highest potency of medicinal properties. To harvest, cut the entire stalk when the small flowers have appeared (or even before).